Hey guys welcome back to my blog today’s hair tutorial is one that is inspired by photo that. I had seen of floating around on Pinterest instantly fell in love with this hairstyle because it combines two of my favorite hairstyles that.
Half-up Half-down Hairstyle Fishtail into Pull Through Braid Photo Gallery
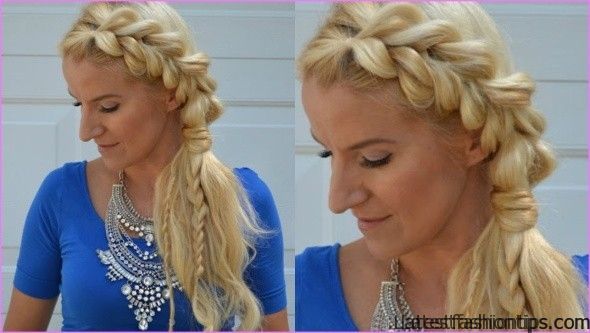


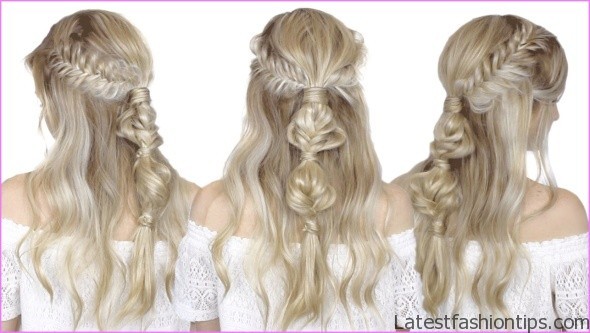


I have on my blog which is the Dutch fishtail half up half down hairstyle combined with a pull through braid you guys this hairstyle is absolutely stunning and it will definitely turn heads wherever you wear it. I spent last night practicing this hairstyles that. I could simplify it and then share it with you guys. So for the tutorial you will need two things first thing is a bunch of these clear elastics I have seen a lot of comments on my posts saying that these elastics rip people’s hair oh and they totally do. So what. I suggest doing is stretching these out a little bit. So they do not sit.
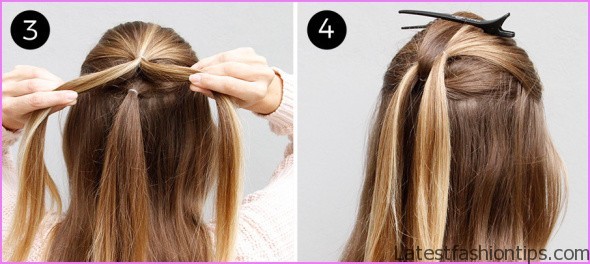
So tightly in your hair and then have somebody that you trust to cut them at the end of the day for you and then you also need some bobby pins preferably ones that match your hair color these match my roots.. So I guess these kind of technically counts but these are not necessary they are just going to help position the braids in the spot that we want if you do not have bobby pins do not worry about it. So go ahead and a part your hair is normal and then what. I like to do is just gather my hair right at the crown of my head and, I’m also going to grab the hair that’s directly below the crown as well just to help thicken up that ponytail and the purpose of this is to help create volume without having to tease your hair this will also act as our first ponytail for our pull-through braid later on and yes still using my bronzer as a mirror but what. I like to do is grab really small sections and gently tug on them to create that awesome lift and volume of the crown without the damage of teasing. I love this technique.
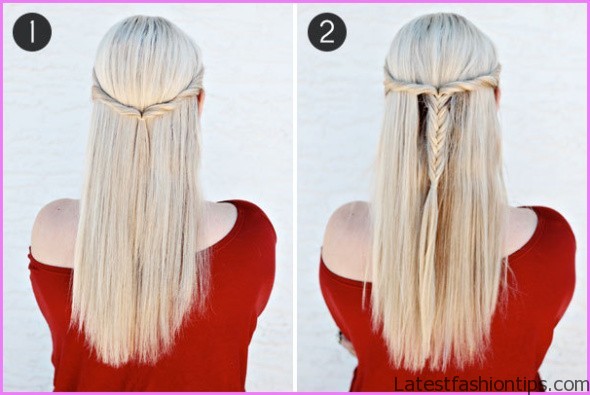
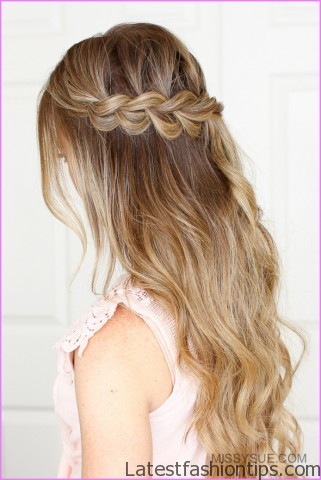
So now we just want to go ahead and create two fish tails you can definitely do to dutch fish tails if you want but, I’m just going to do regular ones they are easier to do and, I think that they look just as great. So, I’m going to grab a section, I’m going to go all the way to my crown and then down. So it is about we will say two inches wide three inches deep and then, I’m also going to be leaving down my bangs and then you also want to leave down enough hair just to cover your ears just to give you that more bohemian kind of vibe and then to help this braid appear even thicker, I’m just going to sneak in a little left into this section and just slip it into place alright. So now divide that section into two equal pieces. So you can sort the fishtail and what you want to do is grab a small piece from the outside of the back section bring it over and join it into that front section of a small piece from the front section bring it over and then join it into that bottom section. So you can see the cross that we are making and then just keep repeating this all the way down just really take your time with this. I find that the fishtail is a big statement of this hairstyle.
So you do not want to rush it you really want to make it look detailed and intricate and it’ll really stand out for you also as you are fishtailing since we are going to be tying these behind her head try directing the fishtail backwards.. So I stopped Midway down just. I can start pancaking the fishtail before it gets too tight and, I like to use my index finger and thumb just to gently pull on the sides to help fake that fuller appearance do not be shy really exaggerate the braid try to pancake it even a little larger than you are used to like. I said earlier these fish tails are really the statement of the hairstyle and, I wasn’t happy with it, I’m going to continue push Kaling all the way down to the end remembering to pancake the rest of it.. So I went ahead and just tied off the end of this fishtail and, I’m going to repeat the same thing on this side.
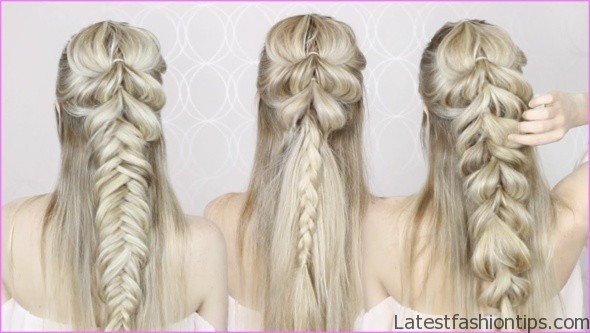
So you grab the section all the way to the back of Micra oan and i’m going to remember to leave out some front pieces just to frame my face and then leave enough hair to cover my ear as well then again, I’m just splitting this section in half just to sneak in a little left of hair and then, I’m going to fishtail this section to the end remembering to stop Midway down just to pancake the braid now that. I have my two fishtail braids. I just want to cross them over one another. So starting with the one on the right directing it backwards and over top of that ponytail that we created earlier making sure it is laying flat against your head and then, I’m just taking some bobby pins sliding them through the middle of the fishtail and securing it tightly against my head and then, I’m repeating the same thing on the left side laying the braid over top of the previous ones. So they cross over each other and then remembering to secure it into place. I notice that my left braid wasn’t sitting as high as my right..
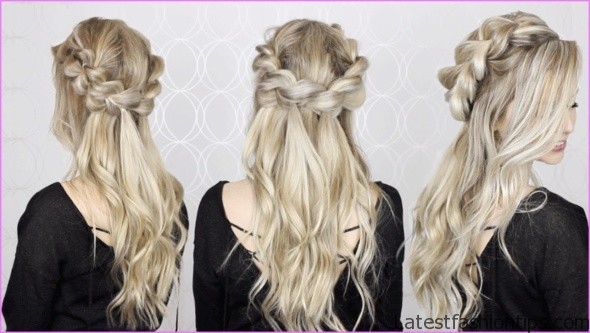
So I just went back in and adjusted it with some more bobby pins you want the braids to sit a little higher than our Center ponytail. So that they have more of a cross effect versus overlapping each other and then, I’m just going to roughly secure the ends of my braids down. So that they are out of my way and then as you can see, I’m left with my ponytail from earlier in the middle now we can move on to the pull-through braid. So clip that ponytail up and out of the way and then you want to create another ponytail below it just by gathering the ends of our fishtail braids. So remove those bobby pins the elastics and gently brush at the bottom of the fishtail and then gather up a little bit more hair just to create a thicker ponytail now unclip that top pony’s divide it down the middle into two equal sections placing them out of the way grab that lower ponytail pull it upwards in between those two sections clipping it up out of the way as well now grab those two sections that we have placed out of her way and join them with a hair elastic below our ponytail and then you just want to repeat this pattern all the way to the bottom, I’m flipping the top ponytail dividing it into two placing it out of the way and then taking that lower ponytail flipping it up through the middle out of the way and then joining those two sections below the ponytail create as many folders as you like. I did about ten just to really help add detail and dimension now to really step up this hairstyle pancake those pull through xsame as the fishtail. I like to pull on the outsides to give them a fuller appearance but to really make this hairstyle stand out try to have each of the pullthru taper in size from largest at the top to the smallest at the bottom.
So really make that top pull through dramatic and then minimize the amount of pancaking the lower you go there you have you guys my arms are very tired as, I’m sure yours are too if you recreated this but it was just. So worth it absolutely love that double fishtail and, I love how it crosses into a full view braid anytime you combine two braids into one hairstyle. I instantly love it. I just think that’s really and definitely eye-catching you will have to comment down below let me know what you thought and definitely let me know if you recreate this hairstyle or if it inspired you to try something new but. I really hope you guys enjoyed this tutorial if you did do not forget to give it a thumbs up it means. So much to me but thank you guys. So much for taking time to watch my post.
I hope you guys found it helpful and I will talk to you my next one bye.
Maybe You Like Them Too
- Stephen A. Smith A Biography
- Steny Hoyer A Life in Public Service
- Sheryl Underwood A Life in Music and Comedy
- Scott Walker A Life in Song
- Sara Evans A Biography

