Today, I’m bringing you some beautiful heatless short hairstyles that are kind of like an updo in a way they are super easy they are beautiful you can wear them to work you can wear them on a date to a wedding whatever it may be.
3 Heatless Up-Dos For Short Hair Tutorial Photo Gallery
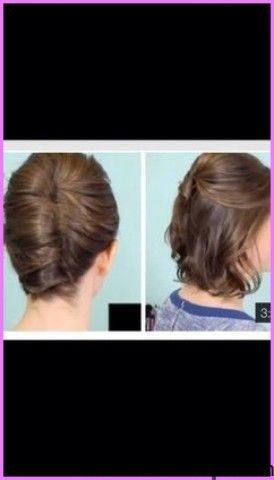
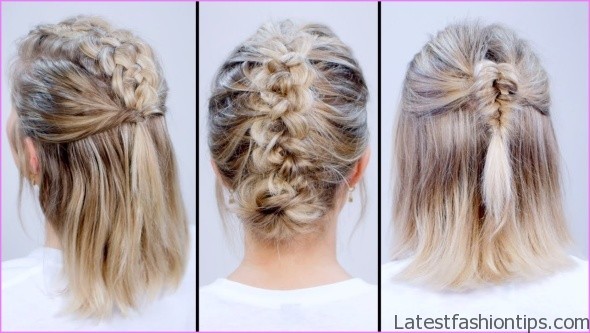

But the best thing is they are heatless and they are super easy and fast for these short hair updos you will need a couple of products to work with to make the hairstyles work bobby pins and clear elastics and also depending on what type of hair you have. Because, I did wash it today it is super silky and soft and does not have a lot of texture and grit. So I’m going to add a couple of my favorite products into my hair that Elizabeth and James Nirvana black dry shampoo and the orb a dry texturizing spray and can, I just say, I love the colors black and gold together obviously, I love them together they’re. So pretty. So the first hairstyle is going to be a contemporary French twist I’m going to start with the first section I’m going to start where my eyebrows to have that little arch I’m gonna just take my my pointer fingers meet them in the front and then meet them in the middle to grab a section of hair I’m going to split it right in half and this is where I’m going to start Criss crossing them over once I’m going to go to this side first grab a section of hair about towards the middle where the section like crosses over and I’m going to add this new section over to the other section on the other side just like that go to the other side grab a section of hair and then add it to the other side. So you see it is kind of adding this full braid. But kind of just a crisscross the continue doing that until you reach about the crown of your head once you get to the crown of my head I’m going to cross the sections over one more time without adding hair stop and then I’m going to tie them off with a clear elastic.
So they stay in place. So let’s move on to the French twist portion of this hairstyle and I’m going to start on the left side of my head and I’m going to start gathering the hair towards the back in the middle once this left side is nice and smooth going towards the back of the middle of my head I’m going to take my bobby pins and start bobby painting my hair nice and to my scalp going from the bottom to the top of my crown to help the section be a little bit more tight and secure with the bobby pins, I like to cross the body pins over each other going from the bottom towards the top let’s create the French twist portion of the hairstyle. So the whatever here you have left I’m going to gather it towards the back of my head towards the middle where the bobby pins are and that’s also a great guideline as well as it keeps the hair secure. But it is also a great guideline to wear the twist should be laying. So the TWiT should be perfectly in the back of the middle of your head. So I’m just gathering my hair and making sure, I do not have any crazy bumps and then once, I have it sort of like in a ponytail. But not really that’s what I’m going to start creating the twist.
So you take the ends and you tuck them a little bit and then you start rolling kind of like a pizza dough or some kind of bread that you start rolling towards the middle underneath the actual hair towards the bobby pins. So it creates that beautiful French twist and then once you have the desired twist you are going to start Bobby pinning it away and securing it yeah cinnamon rolls like. So after you are done pinning down the French twist I’m going to go back up to this area right here and I’m gonna sort of section it a little bit and make it a little bit more voluminous towards the front to kind of give it a little bit more texture on the top of my head and like you saw, I only focused right here towards the front where, I raised it and give it a little bit more volume and, I think it gives a nice contemporary twist on the French twist hairstyle what do you guys think, I think this is perfect for work for date nights for weddings, I love this hairstyle super easy it is a little bit different with a twist. But it is super pretty, and it is classic duty this hairstyle is surely we. So hairstyle number two is going to be a sleek updo. So just grab it a nice section of hair make sure it is pretty even on each side and then take some bobby pins and then secure it once, I have a pompadour in the front all nice and pinned down I’m going to start working on the sides of my head and I’m going to pin them underneath the sections running down the middle make sure it is nice and smooth down you can use a comb to smooth it down. But make sure you grab the hair and you put it underneath this front this middle hair in the back.
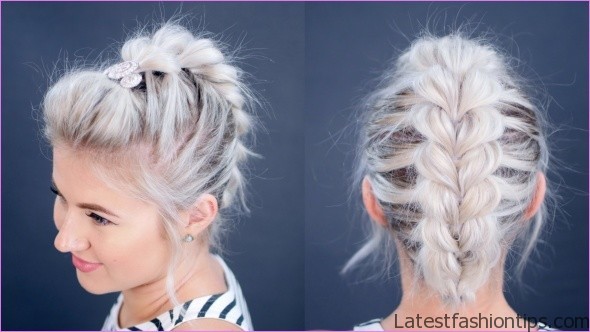
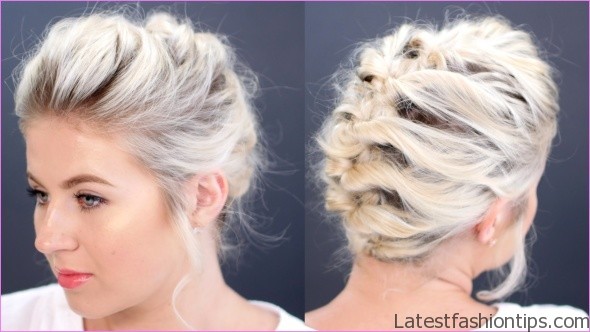
So I’m going to work my way down from the top to the bottom on the side hairs and make sure when, I pin them back towards the middle of my hair, I may, I have a nice big section of hair that’s going down the back of my head and then continue working on the other side as well working from the top down once the sides of my hair are pinned back towards the middle I’m going to be left with like this faux Mohawk towards the back. So, I gather my hair in the back, and it is gonna be into either a messy bun a low ponytail depending how how long your hair is how short it is, I like to do it into kind of like a low messy bun, I roll it tuck it and then, I kind of messy it up and pin away the ends with bobby pins. So the reason why, I love this hairstyle so much is. Because it is so versatile, and it is different and it looks like it took me a long time to create it. But it is super easy and a lot of different directions the hair is going to have a little bit of volume it is going sleek on the side it is going down in the back and then whatever you want. Because of the length of your hair you can either leave it down you can do into a low ponytail you can do like a messy bun like, I did it is very fun play with it and see what you like this next hairstyle is going to be a sleek rocker look kind of like on the take of the pull-through braid. But it is far simpler I’m going to grab a section in the front I’m going to take it towards the back once you have a nice section of hair take the clear elastic and this is where we start doing that little rocker look.
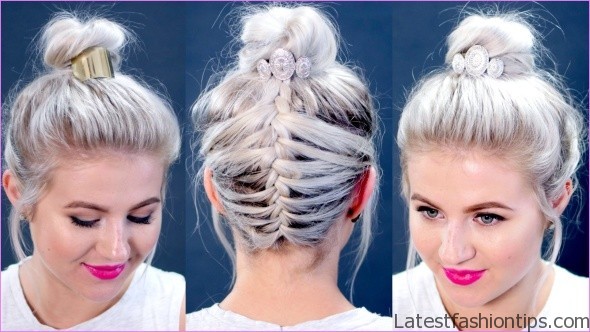
So I’m going to take elastic once and then the second time I’m gonna almost take the hair through. But I’m going to leave it about like halfway out kind of like a a messy bun in a way guys like a half bun before, I move on to the next sections for the ponytail or the half messy buns I’m going to take this section right here whatever is left kind of like the full ponytail and I’m going to wrap it around just to hide a clear elastic I’m going to add at least 5 to 6 sections of hair like, I did to the first one just to have make the a little bit more tighter together. So there wouldn’t be a crazy amount of space in between the sections. So I’m going to just continue down and just same thing take a take some hair make sure it is not too crazy on the sides and then take clear elastic and tighter. So, I actually did seven sections. Because, I want the sections to be as close as possible to each other. But you see how you can see kind of through them now we are going to go in and kind of loosen them up and then pin them back with bobby pins and just to create a more fuller effect.
So it really helps to make it nice and full I’m going to take the bottom section and connect it to the top one from from above just connect it tick the bobby pin and pin some sections away we will slit up from the bottom connect it from the top section we are kind of bringing them down closer to our scalp. So it is not flying everywhere now move on to the other side and do exactly the same thing focusing on the outer portions and connecting the bottom and the top pieces together to create a more fuller effect. So there you have it this is kind of like my sleek rocker look where it looks super intricate and detailed. But yet it was super easy to do, I love it alright. So there you have it, I hope you guys liked my super simple yet polished updos for short hair let me know which one was your favorite in the comments section down below thank you so much for reading and spending some time with me and I will see you guys very soon bye.
Maybe You Like Them Too
- Tamar Braxton A Life in Music
- Sunny Hostin A Biography
- Steve Coogan A Life in Comedy
- Sterling K Brown A Biography
- Stephen A. Smith A Biography
