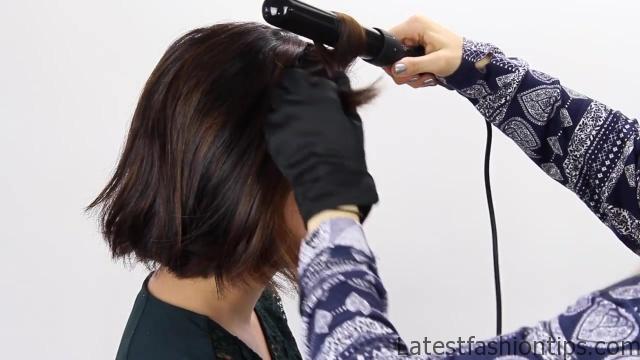
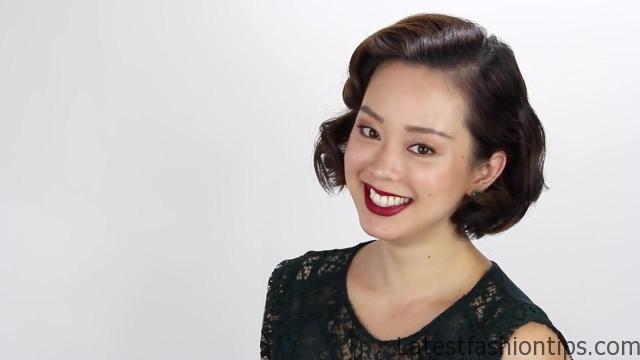
Hey everyone kelly here and today we are doing some short hair holiday hairstyles on the screen today is my friend serene she also has a YouTube channel called dress yourself happy which is all about inspiring you to feel and look your best she has a great channel you should definitely check it out and let’s get into these hairstyles so for my curls today I’m going to use the nume lustrum set and for this hairstyle I’m using the one and a quarter inch curling iron you guys know that I use new me for a long time and I love their sets this nume lustrum set worked really well with serines hair because of the heat that it has.
So I went ahead and separated her hair from the ears up and this section just has little short hairs so my whole goal was just to get a little bit of Bend to the hair and if on your haircut these pieces of hair are especially short do not even worry about curling them because the hair from the other sections will probably cover it up for Serene the end stuck out just a little bit so I decided to go ahead and curl them and also make sure that you are wearing your protective glove if you are using a wand for this because you want to be able to curl the ends without hurting your fingers at all then go ahead and let down the rest of the hair because she has a lot of hair.
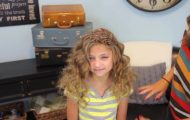
3 Short Hair Holiday Hairstyles! Photo Gallery

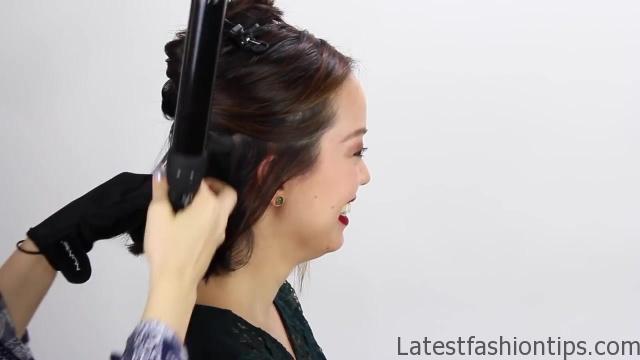

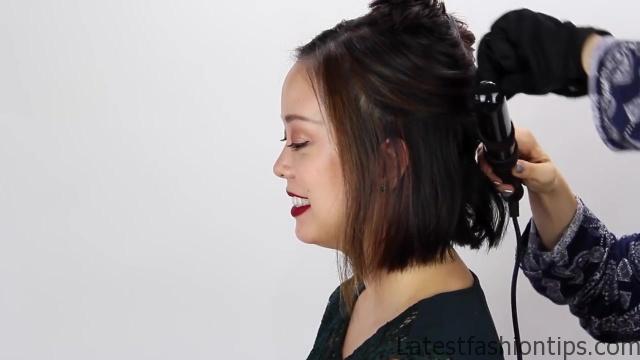

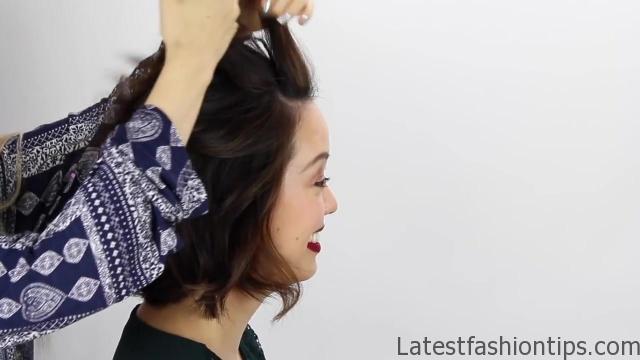
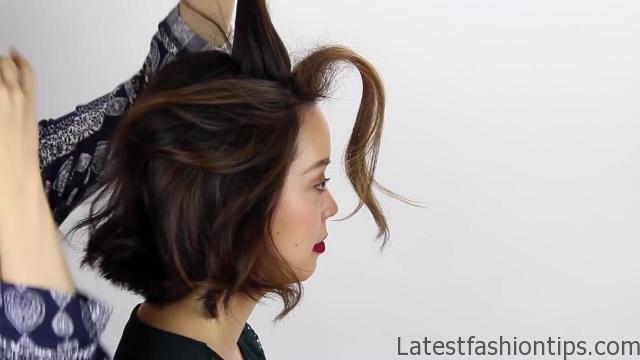
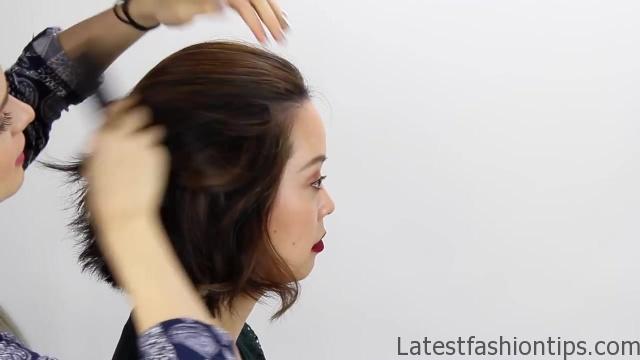
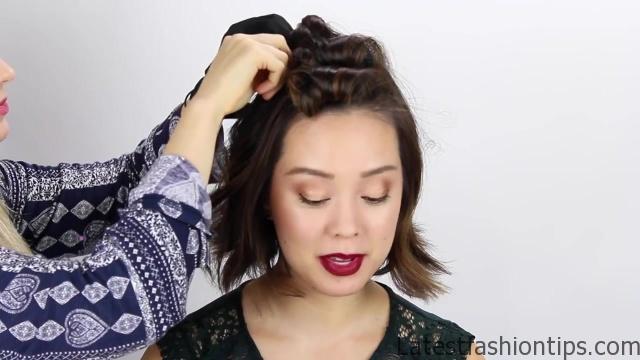

I went ahead and split this section in half again and then I started curling all the hair away from the face I did pick this one and a quarter inch barrel because I like that it gives a soft natural wave to the hair and it gives a lot of body without being like tight shirley temple ish curls I feel like you have to kind of go a little bit bigger than you think you need to with short hair that way you do not end up with the Shirley Temple effect anyway I’m curling all the hair away from the face and then I’m going to drop the next section down and do the same thing again if you have less hair you could do this all in one section and not have to do you know the two sections like I did with Serene’s hair once you have all the hair curls then we are going to go ahead and do the half updo I’m going to separate the hair from the temples up and then I’m going to add a little bit of volume to this section I’m going to add in a little bit of volumizing powder this is the sexy hair powder play.
I’m just sprinkling it in in sections at her roots and then I’m going to go in and lightly tease the hair in those areas her hair didn’t wanted he’s too easily hence I use the powder and with that that worked really really well so I’m just using in sections that I’m pulling everything back and smoothing the top out and you do not have to go crazy with the teasing you just want enough to give a little bit of lift to your hair especially when you look at it from the front then gather all the hair together and twist it just a couple of times and bobby pin it in place and that is it for the half up portion it is a very easy half updo.
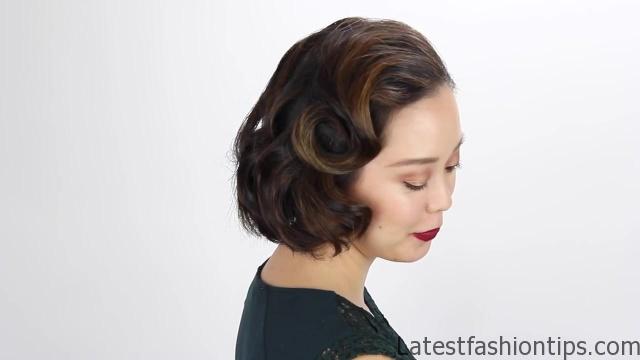
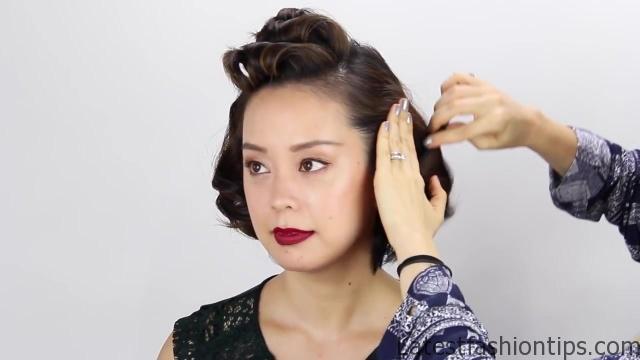
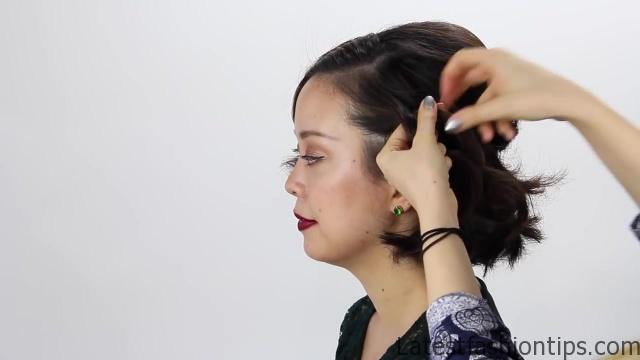
I like it with this really soft wave because it looks very modern and current but still very voluminous and I think holiday appropriate you we are hairstyle number two I’m going to go with the one inch barrel you could also use the three quarter inch barrel if you want an even more retro looking hairstyle I’m going to add in some of the Schwarzkopf crystal shine and hold heat protection sign spray for heat protection and then I’m going to start with a section right next to her part and her hairline you want the section to be as white as your iron and you are going to curl the hair toward the face then once you have curled that hair you are going to go ahead and catch.
It as it comes off the iron and pin it in place to cool then do this two or three more times with the hair right behind that section we are just doing it for this section because this is going to be our S wave and we want this to be a really strong curl but everything else we are not going to pin up because that takes a lot of extra time and it is not really necessary so for the rest of the hair in front of the ears you are just going to curl it toward the face so just go in a couple of sections until all the hair front of your ears is curled and then we can go ahead and move on to the back of the head so in the back I have split the hair in half and now I’m just going to focus on curling the ends and I actually curl these away from the face and then once.
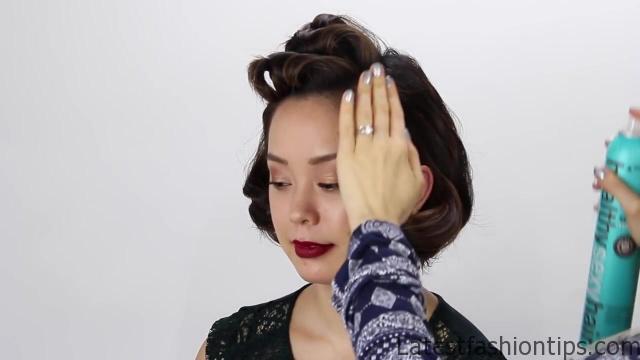
I had this for section done I jot down the second section and continued on highlights curling just the ends of the hair and curling them in kind of different directions because it gave a more modern look to this hairstyle which kind of from the front is super traditional so I liked in the back having a little bit of something different a little bit more broken up then once you have all the curls and just kind of shake them around and that’s all we have to do with the back in the front go ahead and arrange the hair that’s kind of curled toward the face so that it curls just underneath the ears and then on the other side we are going to brush the hair straight back so that it looks nice and smooth on one side and go ahead and tuck it behind the ear I used a little bit of hairspray to kind of help it stay in place as well this is the healthy sexy hair soy touchable hairspray it adds shine but also helps with the hold without being crunchy and now for the most important part of the hairstyle we are going to go ahead and let these curls down and then start breaking them up with your fingers that way they are going to be a little bit easier to brush through then begin brushing or combing the hair back away from the face.
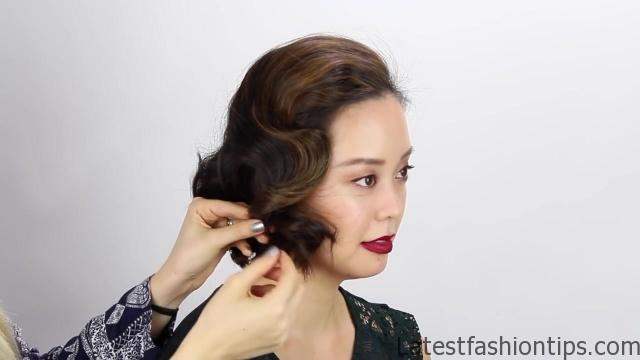
You’ll see this wave start to form use one hand to hold the hair in place and then you will see that the hair starts also kind of curving forward towards the face and that’s the other side of our wave so you can brush the hair for we are just underneath your hand to help enhance that wave now because our hair was a little bit shorter it was actually popping right up into kind of a pin curl right there if her hair was even an inch longer.
I would have coaxed it into being kind of this wave that kind of finishes out just under her jaw but because it was popping up so nicely into that pin curl I just went ahead and pin it in place and a pin curl right there if your hair is a little bit longer you could go ahead and take that in down and incorporate it with the other ends so now just giving that a little bit of hairspray to hold it in place finally I noticed this little bubble that I did not like at all so I decided to go ahead and pull that back behind her ear and use a bobby pin to hold that in place if you have like a pretty sparkly brooch you could use that here as well and that would be really pretty and that’s up for hairstyle number two I’m always going to be a fan of an old Hollywood hairstyle especially for holiday I think it is just so pretty and traditional but glamorous at the same time now hairstyle number three will look good on any hair texture.
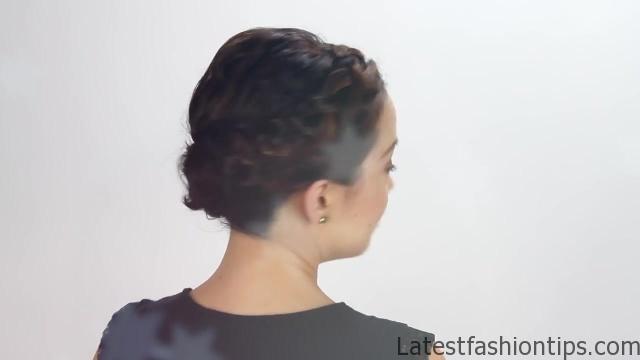
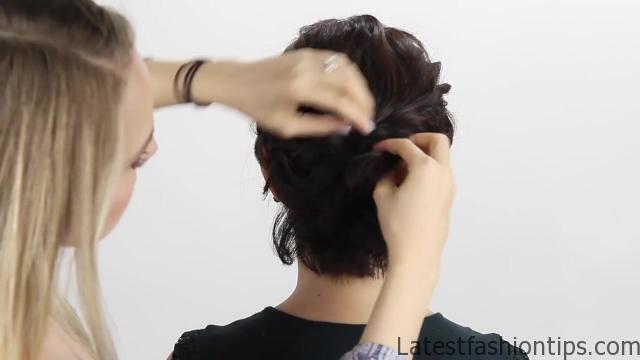
I decided to use the pro wand attachment just to get a nice natural looking wave on the hair so I just curls the very top layer of hair because everything else is going to end up in an updo anyway and I curled all that kind of in differing directions to get this very natural wavy look and I bet for some of you guys that’s actually like your natural hair texture so what I did first was to take the crown section of her hair and just tease it a little bit with the wide toothed comb and then smooth it out then I gathered it all together and pinned it in place this just gives you a little bit of volume between the braids and helps it to look a little bit more up dewy then for the braids I went ahead and did a Dutch braid.
So I took a section of hair right next to her part split it into three and then began braiding underneath this gives the braid its d look then I rated in hair only from the front so I picked up a section of hair right from her hairline and rated it in but then on the other side I just braided the hair normally and then I just continued doing that until I braided all the hair from just behind her ear basically I would just go until you can’t get your hair into the section anymore because once you get to the back you are going to run into some really short pieces and once you have gotten this far down the hair as you can go ahead and secure.
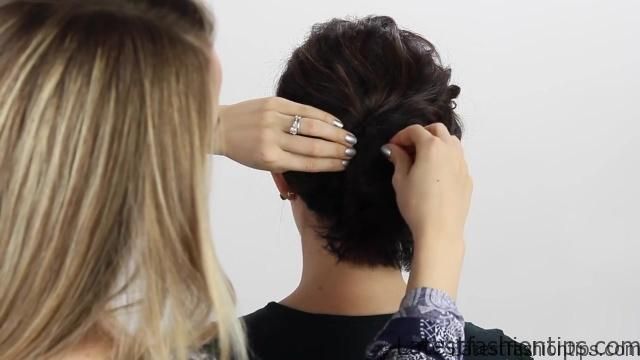
It with an elastic now begin gently massaging the braid and pulling at it to make it a little bit bigger you do want to be gentle with short hair because if you pull too hard you could accidentally loosen up some flyaways which you wouldn’t really want you can see here I’m going gently and it really helps to volumize the braid now we are going to do the same thing on the other side so I’m taking another section right off of her part and I’m doing the same lace braid braiding under and then pulling in hair only from the front and again.
I’m going to go back until I have gotten a lot of the hair from behind her ear incorporated into the braid then I’m braiding the hair that I have left just a couple of times normally and I’m going to secure it with an elastic then of course I’m going back into volume ice this braid even more if you wanted even more volume you could use a little bit of that volumizing powder that we used on the roots and that would even help to expand the braid more I have some product in her hair already so it was volumizing a lot on its own now just go ahead and pin the ends of those braids over the bobby pins that we have left ideally you’d like to overlap these braids if you can but if they do not quite fit do not worry and you can see here this would actually be a really pretty half updo all on its own but I decided to take it a little bit extra and make it into an updo and what I did was I took sections of hair that we had left down.
I pulled them to kind of create a circle so that it looked almost like a bun so I just kept pulling pieces and pinning them and pulling pieces and pinning them until I got the shape of a bun now if you wanted this to be a more bohemian looking hairstyle you could pull those pieces in whatever direction you want and just bobby pin them and let the bobby pins be visible I have seen a lot of short hairstyles like that and I think it is totally edgy and really cool so if you like that look just like pin where ever you see fit and let the bobby pin show it honestly I think it looks pretty cool but this is kind of the more elegant version of that if you wanted to see it so that is how I got the bun shape and then once that was done the hair styie is complete I think this hairstyle is great I love the braids and I love that it looks like an updo and it makes you look like you might have like longer hair than you do which is kind of cool and that’s it for my short hair holiday hairstyles if you are interested in any new me tools this is a great time of year to buy them you can use the code holiday melts to get % off their holiday collection or holidays with Kaylee to get eighty nine dollars on any set including the octa wand I hope that you guys enjoyed this post and be sure to come back for my next one I will see you then well bye.
Maybe You Like Them Too
- Celebrating Natural Black Women’s Hair: A Guide to Gorgeous Hairstyles
- Short Hairstyles For Women Over 60
- 20 Thrilling Twist Braids Style to Try This Season
- The Top 10 Asymmetric Hairstyles
- 10 Gorgeous Shaggy Bob Hairstyles To Get You Out Of A Style Rut

