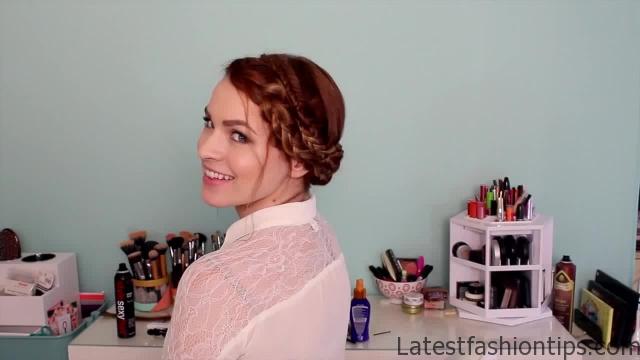
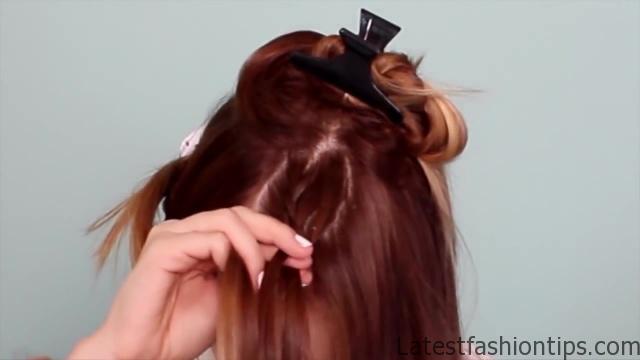
This braided crown updo inspired by demi lovato she with us on the x-factor recently. And I tried out, and instagrams it as well, and a lot of people asked for me to do the tutorial then as well. So we are going to go ahead, and talk about it now she is a little bit difficult, I will not going to lie but. I think it is definitely doable first of all you want to make a deep diagonal part, and then separate your hair starting about three or four inches back from the hairline, and going toward until your ear unless you get to your ear that’s kind of the end of your section there, and you want to clip that out of the way, and then repeat the same thing on the other side going three to four inches back from your hairline until you get right to your ear then start that hair off, and secure it with the clip then separate your hair from about the occipital bone up, and separate that out of the way, and that is our final section we are going to start with the section that’s up in the front, and we are going to do our first very big Dutch braid the is kind of the focus braid if you will of the style. So you are going to start at the back of the part you are going to braid forward toward the face doing a Dutch braid the reason that you do that is. So that it looks really pretty when it gets up to the face cut it is a lot thicker, and bigger.
Demi Lovatos Braided Crown from the X Factor Auditions Photo Gallery


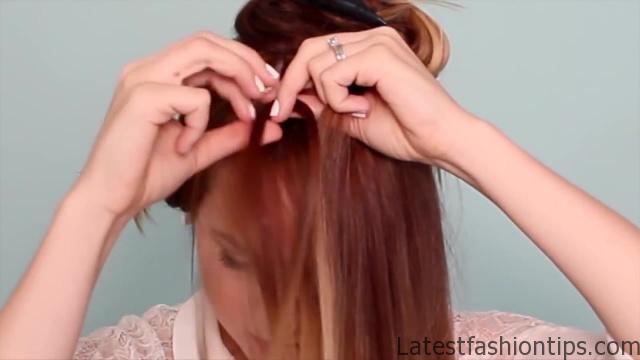
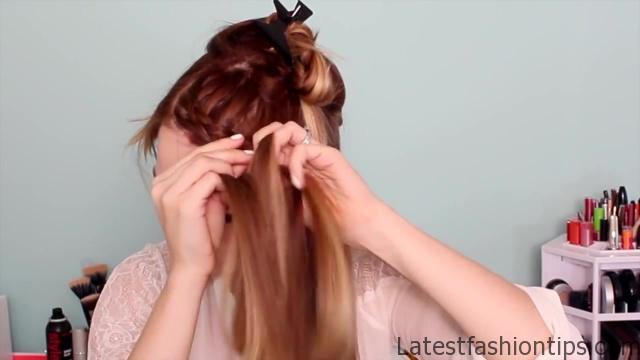
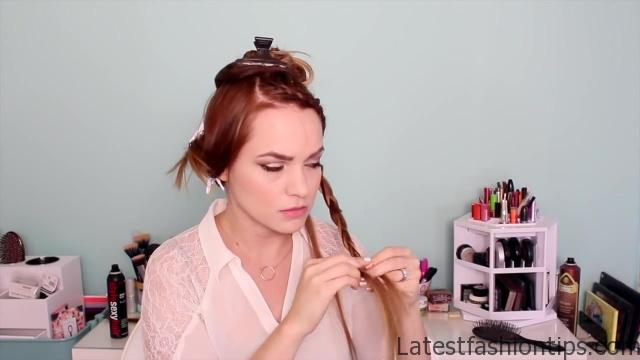

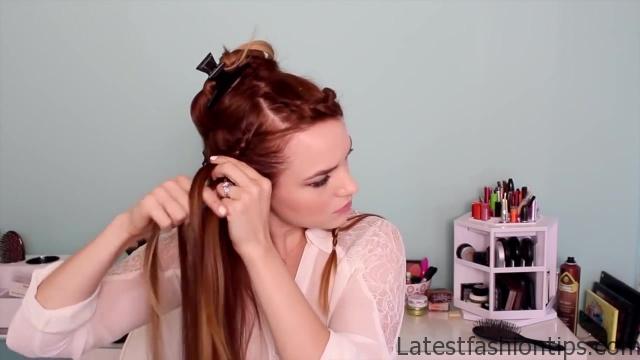
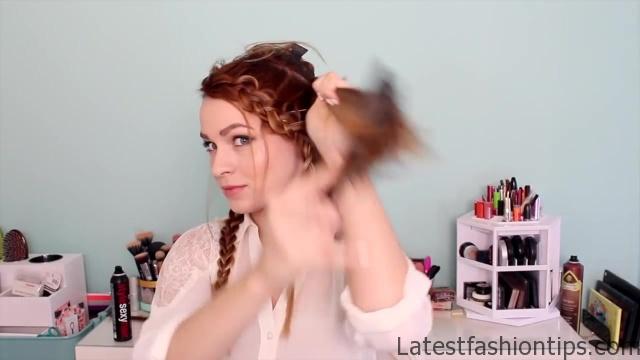


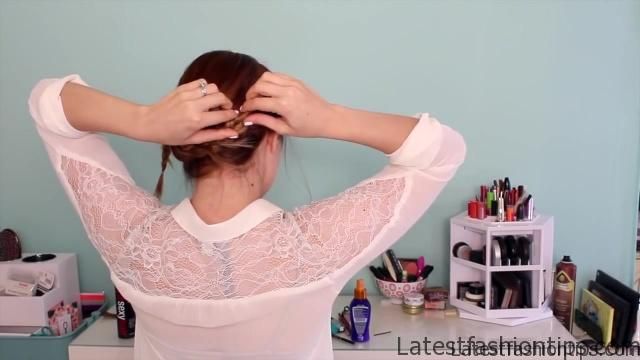
So it has kind of more of a statement to it, and you do not have any weird like areas where there’s no braid yet if that makes any sense. So you just braid forward until you get to the hairline, and then go ahead, and turn your hands, and start braiding along the hairline, and you want to keep this about medium tension here we are going to go back, and kind of pull the braid out a little bit to make it as big as possible especially if you have fine hair like mine. Because you are definitely going to need to do that to get that big voluminous braid like she had, and then you are just going to keep braiding until you completely incorporate all the hair from that section. So you should get down to the top of your ear or maybe even just a little bit behind your ear depending on how you took that section, and then of course once you get there all you are going to do is braid the rest of the hair normally, and once you have braided all that hair you want to go ahead, and secure it with a small band to make the rest of this hairstyle easier. So that it is not unraveling when you are trying to work on the hairstyle. Because that would not be any fun. So once all that Sun you are going to go ahead, and take your fingers, and begin to pull the brain apart a little bit but that’s going to do is to make it look about twice as big at least as it was before. So it makes you look like you have more hair, and it creates more of a statement a little bit more visual fact as well.
You want to start at the bottom, and do that going toward the top until you reach the very top of the braid, and you have your braids nicely but aluminize alright, and what’s that done we are going to go ahead, and do another Dutch braid on the other side of the part what’s different about this one is that you are actually rating this one on the back of the section rather than next to the hairline that’s how Demi Lovato’s hair was done. And I kind of liked it. Because that keeps all the visual interest on that one really big braid but you can always do it right next to your base if you wanted to as well. So just going to braid at the back of that section incorporating hair from both sides until you have incorporated all of it then fluff it out again like we did on the other side, and that’s it for that braid, and then we have a fishtail braid. So you are going to take the section that we left out at the bottom, and basically you are going to go ahead, and brush it up towards your face. Because you are going to braid towards your face this braid is going over your head. So it helps if you start it out going up towards your face. So you do not end up with any weird bagging now if you do not want to take the time to do a fishtail. Because they take forever you could do a normal braid here as well, and do not forget of course to pull the braid apart to make it look extra big, and awesome, and now the final braid are you guys tired of reading it you are going to take this last section which is the crown section, and if you want to make this easy on yourself just do a normal braid if you want to be extra fancy do either a lace braid or a Dutch braid along the nape of your neck honestly there’s not a huge difference either way. I just was feeling extra fancy that day when. I was filming, and then of course finish it off with a normal braid flip it out you guys know how this goes right now right, and now we are going to put it all together.
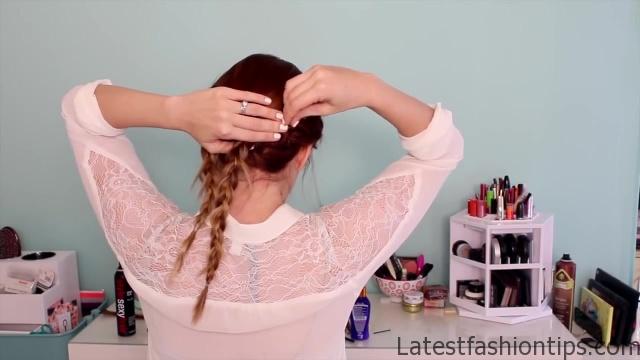
So first of all you want to take care of the front. So you are going to take that first tail braid, and pull it over the top of your head, and then pin it in place underneath the other Dutch braid on the other side of your head even if your hair is a little shorter it ought to make it at least to the top of that braid for the back you are going to do whatever works with your hair links what. I did first was to pin this one braids going toward the right just. So that. I could continue working with it but before. I did that. Because. I only had a little bit of hair left from that first Dutch braid. I went ahead, and put it underneath the second Dutch braiding kind of h it except for that one end that was sticking out. So that. I wouldn’t have to deal with it, and then with the remaining braids that. I had left. I made kind of a smile it shape to continue the shape of the crown going around my head. So I pulled that one that was going to the right all the way across my head, and then, I will taking this one that was on the right all the way to the left, and pinning it down, and then all you have to do is work with the little ends. So, I will tucking my ends in, and then fitting that in place, and then to tuck these ends in, I will actually putting it underneath my fishtail braid cut that’s just how it worked out but literally every time, I have done this, I have done that last part different just depending on how the braids worked out. So once you get all the braids done pin your fishtail braid, and then just do whatever you need to do figure it out for yourself on your own hair. And I think it’ll work out well for you. So that’s it. I hope you guys have enjoyed this make sure to check out my previous post, and come back next week for some Halloween hair tutorials. I see then what.
Maybe You Like Them Too
- Celebrating Natural Black Women’s Hair: A Guide to Gorgeous Hairstyles
- Short Hairstyles For Women Over 60
- 20 Thrilling Twist Braids Style to Try This Season
- The Top 10 Asymmetric Hairstyles
- 10 Gorgeous Shaggy Bob Hairstyles To Get You Out Of A Style Rut

